Recreating the Native 3D Depth of Freddy’s Dead: The Final Nightmare Through 2D-to-3D Conversion
- Admin

- Nov 14, 2025
- 6 min read

When Freddy’s Dead: The Final Nightmare hit cinemas in 1991, it needed that something extra to grab some attention, something Freddy and New Line hadn't done before: 3D! Hence the film's conclusion was a 15 minute finale, shot natively in stereoscopic 3D. Viewers were provided with 3D glasses for the climactic scenes, dragging them directly into Freddy Krueger’s twisted dream world.
Decades later, that short 3D sequence still fascinates and frustrates fans and 3D restoration enthusiasts alike due to the "anaglyph only" versions available on contemporary home media. Even the most recent 4K restoration release limited the 3D sequence to a red blue presentation, where it should have been relatively easy to provide a BD with a full color stereoscopic presentation, were there a drive on the part of the studio to do so.
At EYEPOP-3D, we wanted to see whether a modern 2D-to-3D conversion could simulate the look, feel, and perceived depth of that original native footage. Could digital depth reconstruction replicate the immersive native 3D cinematography? Or if not that exactly, what could we achieve on zero budget?
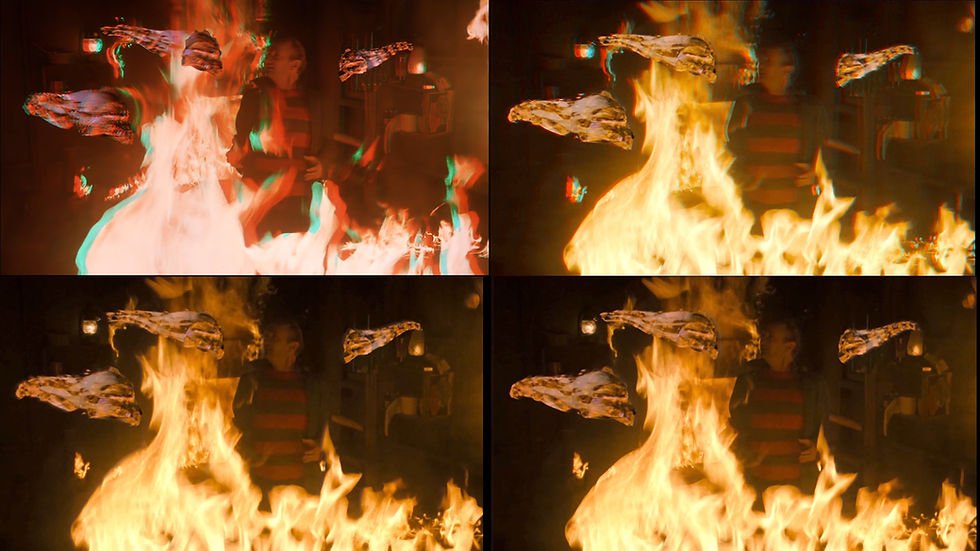
Of course it's quite tricky to demonstrate here using anaglyph images, and it is the reverse of what we're trying to achieve anyway, so please check out the side-by-side video for the full experience. Our example frames here have the following layout:
TOP LEFT: ORIGINAL ANAGLYPH SOURCE (DVD UPSCALED)
TOP RIGHT: EYEPOP-3D CONVERSION ANAGLYPH OUTPUT
BOTTOM ROW: EYEPOP-3D CONVERSION FULL SBS OUTPUT (LR)
You can also watch the 6 minute sequence, this is around half the total running time, on YouTube in Half Side-by-Side format:
The Challenge of Matching Native 3D

Native 3D — filmed with dual cameras — captures real stereoscopic parallax. Every object, reflection, and particle of dust exists naturally in space between the left and right eye views. In contrast, 2D-to-3D conversion relies on depth mapping, rotoscoping, and artistic interpretation to create synthetic separation.
The 3D finale of Freddy’s Dead has a distinctive style: sharp foreground objects, deliberate pop-outs, and exaggerated spatial layering designed to wow an audience that suddenly “entered” 3D mid-film. Matching that depth means more than just assigning distance values — it means understanding how the original 3D cinematographer balanced realism with spectacle.
Our Approach

We began by analysing the original 3D ending looking at the strength overall and instances where the 3D may be stronger or more subtle. Our aim was not entirely to replicate the frame by frame, shot by shot in depth - it was to produce a converted piece that felt like it delivered a similar experience whilst not becoming a warpy mess that so many of the one-click auto-conversions create.

Due to our time and manpower constraints the extreme pop-outs were also areas we felt that we were unlikely to match on an unbudgeted experimental conversion of this type so the aim was to generate as much natural pop on these shots without having to spend days rotoscoping and creating clean background plates which would be the optimal approach were we given time and budget to do so. Actually in some ways this is where the source anaglyph fails, the initial sequence with the three entities in Freddy's brain actually looks flat in the DVD rip whereas on ours there is clear volume and even a mild pop-out.
Two new conversions of this footage were created, and having had a previous attempt at this a couple of years back, this first half of the sequence has been cut together from three different converted sources.
As mentioned previously there are some obvious visual flaws, and it doesn't help that the earlier conversion appears somewhat blown out in the outdoor scenes but it is used as it presented the best balance between depth and visual acuity.
The Results

The test conversion revealed how far modern conversion technology and techniques have come. Although native stereo always retains an organic authenticity and is considerably simpler to create strong 3d depth, today’s technology allow astonishing precision — enough to mimic the feel of native 3D, not quite as strong as the native source but very watchable indeed.

Interestingly the conversion appears, in a number of places, dare I say quite a lot better than the anaglyph (at least as sourced from the USA DVD Box Set Release from around 1999) where it can demonstrate both better volume/depth. It equally resolves the vertical offset problems which are very apparent in some of the shots in Freddy's dungeon.

And for transparency so you can compare the actual 3D here is the image with their anaglyph vertical alignment issue fixed. To my eye there still appears to be a more rounded natural volume to the characters face in the conversion (right) than in the native 3D (left).

When viewed side by side, the converted footage generally, but not always, presents less depth than the source material and for the eagle eyed has a few flaws which could likely be further corrected with further passes and more time spent on fixing specific problem areas.

The hyperstereo shots in Freddy's dungeon also demonstrate a considerable improvement over the source which appears to be quite flat.

But as an experiment, it does present very respectable results, especially when compared to being limited to anaglyph on the commercial releases and rather surprisingly it improves on the native 3d in a number of shots.
Why This Matters

For film preservationists, horror fans, and 3D enthusiasts, this experiment suggests that classic films containing partial or lost 3D footage could one day be fully experienced in 3D again delivering near native 3D quality — without the need for original stereo negatives. With careful artistic direction, modern 3D conversion can extend or restore the magic of historical 3D sequences, preserving that sense of wonder for a new generation.

Whilst it may not be identical to original stereoscopic sources however, the improvements in some areas make this an interesting option for films where perhaps only anaglyph sources with burnt in flaws remain, or where perhaps only single eye sources remain. A purist approach of "well that was how it was shot" seems somewhat regressive and limiting where it may be possible to resolve issues which cause visual discomfort and are quite obviously not what the original filmmaker would have intended... well not most of them!
Hopefully with this post and video we've shown that it's possible to create a close approximation of native 3d sources, in some cases improving on what was there and demonstrated that what was historically natively 3D shot is not always the best experience for the viewer.
EYEPOP-3D specialises in high-quality, cost-effective 2D-to-3D film conversions — bringing film to life with immersive depth while staying true to the filmmaker’s vision.

3-D Freddyvision Facts

And finally you might like a few bonus facts about the Freddy's Dead: The Final Nightmare sequence, so here we go...
What the 3D Part Entails
The last 13 minutes (approximately) of the film are in 3D. This is the climactic portion where the character Maggie puts on 3D glasses and enters Freddy Krueger’s dream world / mind, and the final showdown unfolds.
To cue the audience, Maggie putting on 3D glasses is used as a diegetic signal: when she puts on the glasses, the audience is meant to put on theirs. This helps bridge the narrative world and the theatre‐going experience.
How It Was Filmed
The 3D was shot “properly” in dual‐strip 3D using two pin-registered cameras, not simply converted after filming. That means the left eye and right eye images were captured simultaneously.
The process required special technical considerations. The technical specs mention Panavision Panaflex Platinum cameras and Primo lenses for the “FreddyVision 3-D” portion.
For the theatrical print, an anaglyphic release was used: the usual red/blue (or red/cyan) glasses that many 3D films of the era used.
Home Releases & Alterations
The 3D sequence was removed or shown in 2D in many home video versions (VHS, etc.).
Some later releases reinstated it. For example, the 1999 A Nightmare on Elm Street box-set DVD included both the 2D and 3D endings, and even included two pairs of branded 3D glasses.
The British and French rental VHS editions also preserved the 3D ending, with glasses.
Critical & Technical Reflections
Director Rachel Talalay has been quoted as saying that the 3D ending is “actually really good,” especially for what was possible at the time. However, she’s acknowledged that it tends to look far less effective at home, especially with anaglyph 3D, compared to in a theater.
Technically, editing for 3D required different pacing: cuts need to allow viewers’ eyes to adjust. The sequence was written and edited around the 3D portion, not just grafted on.
Why It’s Interesting
The 3D segment in Freddy’s Dead is a snapshot of early-’90s experimentation in horror cinema with immersive gimmicks. It represents:
A desire to push technical boundaries in the franchise.
A blending of narrative and spectacle: using the 3D not just for jump scares, but as part of the plot (entering Freddy’s mind).
The trade-offs of technology of the time: what worked well in theaters often lost impact in home formats.

If you're interested in horror & 3D you may also like to read our post about the Terrifier film franchise and consider if that would be suitable for 3D?

And finally, please don't forget there's a vast library of 3D Blu-rays for sale via our online store.


Comments